Hello friends, hope you all are fine and having fun with your lives. Today’s post is about How to Reset Arduino Programmatically. Sounds a bit weird, yes it is ![]() but literally in some cases, this technique is the only choice you have. It recently happened to me in one of my projects, that’s why I know How important it is. Before going into details, let’s first have a look at the resetting feature of Arduino.
but literally in some cases, this technique is the only choice you have. It recently happened to me in one of my projects, that’s why I know How important it is. Before going into details, let’s first have a look at the resetting feature of Arduino.
If you have worked on any Arduino board, then you must have noticed the RESET pin in Arduino and you may wonder what’s the use of this pin. So, today this pin is gonna get useful. Moreover, you have also noticed that when you uplaod the code in your Arduino board then the Arduino resets, another way of resetting Arduino is by opening the Serial Terminal in Arduino software, while connecting your Arduino board to your computer. As you open the Serial Terminal, the Arduino automatically gets reset. The third way of resetting Arduino is by pressing the push button. When you press and release the push button, Arduino gets reset.
So till now we have seen three ways of resetting Arduino but you have noticed that all of these methods are manual, you have to manually push the button or to open the Serial Terminal or to upload the code. Now in some projects, we have to reset Arduino Programmatically, like we don’t do anything and it just reset itself automatically. Now how can we do that, that’s the topic of today’s tutorial. So, I am gonna share two methods today using which we are gonna reset arduino programmatically. So, let’s start with them.
RESET ARDUINO PROGRAMMATICALLY USING RESET PIN
- In first method, we are gonna reset Arduino Programmatically using the RESET Pin available on the Arduino board.
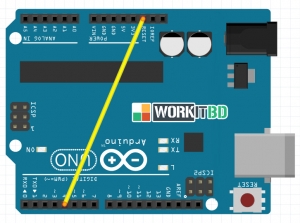
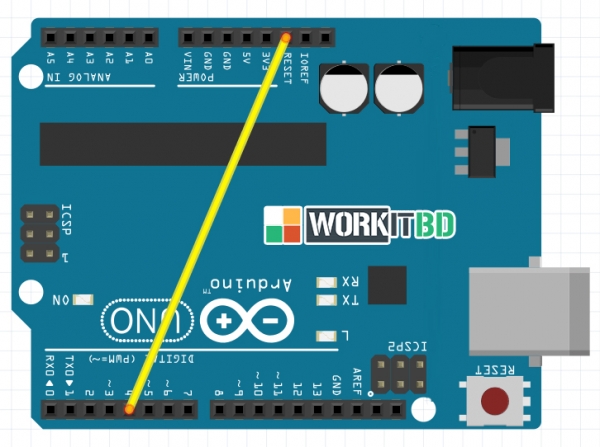
- So, first of all connect Arduino Reset Pin with any of the digital pins as I have connected it with pin # 4 shown in below figure:

- Now upload the below code in your Arduino board and open the Serial Terminal.
|
1
2
3
4
5
6
7
8
9
10
11
12
13
14
15
16
17
18
19
20
21
22
23
24
|
int Reset = 4;
void setup() {
digitalWrite(Reset, HIGH);
delay(200);
pinMode(Reset, OUTPUT);
Serial.begin(9600);
Serial.println("How to Reset Arduino Programmatically");
Serial.println("www.workitbd.com");
delay(200);
}
void loop()
{
Serial.println("A");
delay(1000);
Serial.println("B");
delay(1000);
Serial.println("Now we are Resetting Arduino Programmatically");
Serial.println();
delay(1000);
digitalWrite(Reset, LOW);
Serial.println("Arduino will never reach there.");
}
|
- Now, open your Serial terminal and you will get something as shown in below figure:
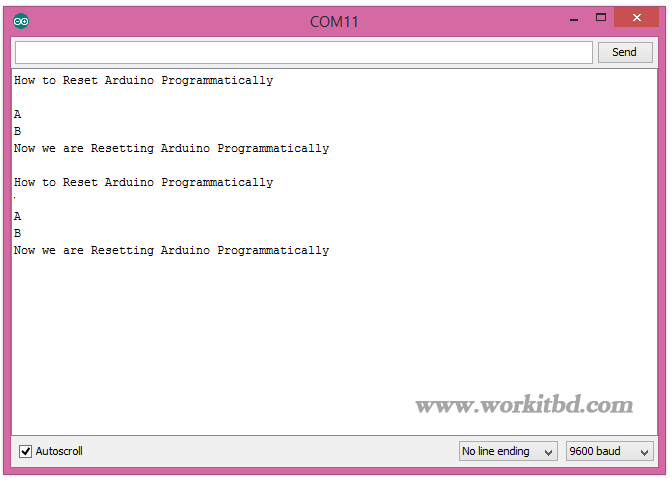
- As you can see in the above figure, our Arduino is not displaying the line ” Arduino will never reach there” and got reset and then display from start. So that’s how its gonna work.
- Now let’s have a look on the second method of How to Reset Arduino Programmatically.
RESET ARDUINO PROGRAMMATICALLY USING RESET FUNCTION
- In this method, we are not gonna use any hardware pin, instead we will do everything in programming.
- Arduino has a builtin function named as resetFunc() which we need to declare at address 0 and when we execute this function Arduino gets reset automatically.
- So, no need of doing anything in hardware and simply upload the below code in your Arduino board.
|
1
2
3
4
5
6
7
8
9
10
11
12
13
14
15
16
17
18
19
20
21
22
|
void(* resetFunc) (void) = 0;
void setup() {
Serial.begin(9600);
Serial.println("How to Reset Arduino Programmatically");
Serial.println("www.workitbd.com");
delay(200);
}
void loop()
{
Serial.println("A");
delay(1000);
Serial.println("B");
delay(1000);
Serial.println("Now we are Resetting Arduino Programmatically");
Serial.println();
delay(1000);
resetFunc();
Serial.println("Arrduino will never reach there.");
}
|
- Now open your Serial Terminal and you will get the same output as we get in the first method and shown below:

- In the code you have seen that we defined the function resetFunc() and then where we call tht function, our Arduino get reset at that point.
It was quite a simple tutorial, but if you have any problem then ask in the comments and I will try to resolve them. So that’s all for
