Hey everyone. I hope you will be fine.
As you know that last time, we had started Arduino UNO course and given you a brief introduction how to simulate the LED blinking and Servo motor control via Arduino UNO and its implementation in proteus ISIS.
Now, today we are going to implement Stepper Motor Simulation using Arduino UNO in proteus ISIS.
Stepper Motor Interfacing with Arduino Simulation in Proteus
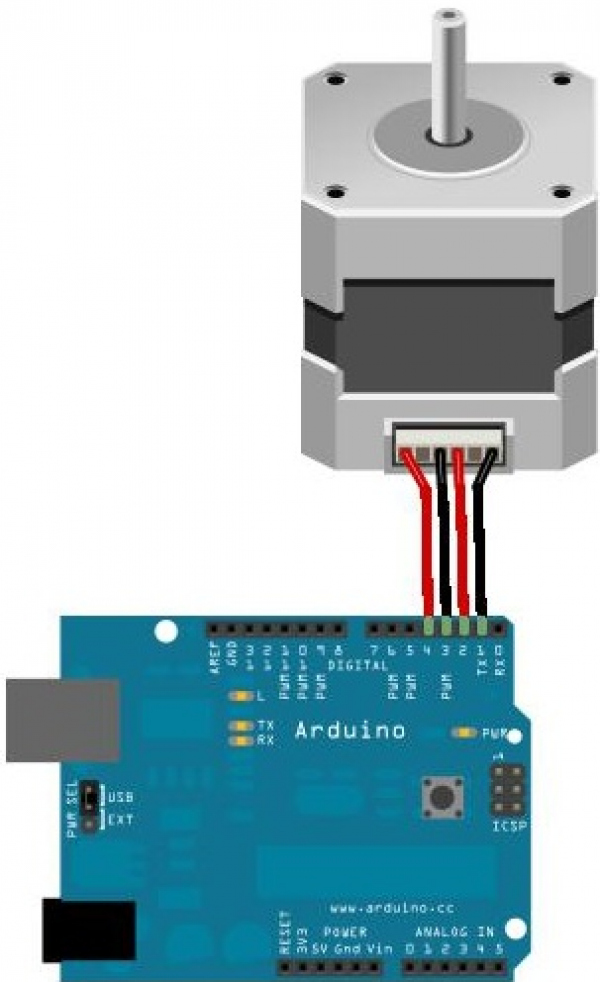
Stepper motor control with an Arduino board sign to be an easier task, and in the following tutorial, you can find how much is easy to control any stepper motor without shields.
Stepper Motor:
Stepper motor fall somewhere in between servo motor and a regular DC motor. It has the advantage that you can be positioned it accurately, moved forward or backwards one ‘step’ at a time, but you can also rotate it continuously.
You can position stepper motor at any desired angle. Stepper motor has holding torque and through this property of stepper motor you can fixed or hold it’s positioned when they are not moving.
Stepper Motor Types:
There are two types of stepper motors
1. Bipolar
2. Unipolar
Bipolar is robust type of stepper motor and have four leads. It has two sets of magnetic coils, and stepping is achieved by changing the direction of current through these two coils. One coil per phase is involved in bipolar motor and current flows in both directions through this coil. Bipolar will be able to produce twice as much torque compared to unipolar.
Unipolar has also two coils but each one is center tap. These motors can step without reversing the direction of current in two coils. Because they are center tap only one half of each coil is energized at a time but they typically have less torque as compared to bipolar stepper motors. Two coils per phase are involved in unipolar motor, one for each direction of the magnetic field.
How it Works?
In general, a stepper motor is controlled by a series of electromagnetic coils surrounding the shaft and converts the electrical pulse into mechanical movements.
Stepper motors diverge from regular DC motors because rather than just spinning in one direction or another, they can spin in a very precise increments. The motor spins very fast in one direction or another. Speed of the motor can be varied with the amount of power which is given to the motor.
Stepper motors can move an exact amount of degrees when articulate to do so. This gives us a proper control over the motor, allowing us to move it to an exact location and hold that position until the next command comes to change the position. This can be done by powering coils inside the motor for very short period of time. The amendment is that we have to power the motor all the time to keep it in the position that we desire. To move a stepper motor, we tell it to move a certain number of steps in one direction or other, and tell it the speed at which to step in that specific direction.
Proteus Design:
Here you look at the proteus design implementation of stepper motor using Arduino. You can run the servo motor in both directions either clockwise or counter clockwise. I am running it in clockwise direction. Now you people can also derive it in counter clockwise direction by making some amendments in the give code.
Code:
#include <Stepper.h> //include the function library
// set pin numbers:
const int a1 = 1;
const int a2 = 2;
const int b1 = 3;
const int b2 = 4;
void setup() {
// initialize pins
pinMode(a1, OUTPUT);
pinMode(a2, OUTPUT);
pinMode(b1, OUTPUT);
pinMode(b2, OUTPUT);
digitalWrite(a1, LOW);
digitalWrite(a2, LOW);
digitalWrite(b1, LOW);
digitalWrite(b2, LOW);
}
void loop(){
step1();
delay(200);
step2();
delay(200);
step3();
delay(200);
step4();
delay(200);
}
void step1 (){
digitalWrite(a1, HIGH);
digitalWrite(a2, LOW);
digitalWrite(b1, LOW);
digitalWrite(b2, LOW);
}
void step2 (){
digitalWrite(a1, LOW);
digitalWrite(a2, LOW);
digitalWrite(b1, HIGH);
digitalWrite(b2, LOW);
}
void step3 ()
{
digitalWrite(a1, LOW);
digitalWrite(a2, HIGH);
digitalWrite(b1, LOW);
digitalWrite(b2, LOW);
}
void step4 (){
digitalWrite(a1, LOW);
digitalWrite(a2, LOW);
digitalWrite(b1, LOW);
digitalWrite(b2, HIGH);
}
****************************
I hope it will be helpful for you. Next time I will explain another tutorial using Arduino UNO and explain you how it can be implemented in proteus to perform desired task.
Any query related to this will be welcomed. Take care for the next time.


