Zigbee can be interfaced with external devices very easily. Zigbee can communicate with external devices like sensors and communications devices. What if someone want to communicate with outdoor devices using Arduino? Yes solution of this problem is Zigbee. There are many wireless modules available in marker like RF, RC transmitter and receiver. But there range is low. Zigbee have higher range than other wireless modules. In this article, you will learn how to interface Zibgee with Arduino Uno R3 ? After reading this article you will get answer of following questions?
- What is Zibgee?
- How it technology works?
- How to use it for wireless communication?
- Applications of Zigbee?
- How to use it for wireless communication between two devices?
- How to interface it with Arduino Uno R3?
- Circuit diagram of Zigbee interfacing with Arduino?
- Programming of Zigbee communication between with wireless devices.
WHAT IS ZIGBEE ?
Zigbee is a wireless communication module which use IEEE 802.15.4 standard. 802.15.4 is a IEEE standard for low power applications of radio frequency. It used in many products now a days for wireless communication functionality. It can be used as a transmitter and receiver both. It used serial communication to send and receive data. It have two series, series1 and series 2. Series 1 is comparatively easy to use and it is recommended for beginners. Series 1 zigbee module can not work in mesh network. Mean it can not talk to more than one zigbees buddies.
HOW ZIGBEE TECHNOLOGY WORKS ?
As I have already mentioned it use serial port to send and receive data. So its mean it can be easily interface with Arduino Uno R3, any type of microcontroller and computer. Because they all support serial communication and they all have serial port to send and receive data. It can also communicate with other Zigbee to form a mesh. Zigbee can also be used to make a local area network. It have many applications. But some of the famous applications of Zigbee is given below.
APPLICATIONS OF ZIGBEE :
Some of the famous applications are given below :
- Wireless communication
- wirelessly controlled robot
- remote monitoring system
- Wireless home automation system
- wireless temperature sensor and many others.
Zigbee alone can’t do any thing. You have to interface it with some intelligent device like microcontrollers, Arduino and computer. These devices will tell it what to do or what no to do through alrady fed program inside microcontrollers and Arduino Uno R3. These digital devices are no such intelligent. But you can make them intelligent by writing few lines of instructions. Let’s move forward and learn how to interface Zigbee with Arduino.
Note : Single Zigbee module is useless. We always need a pair of modules so that they can talk to each other. Oh sorry they are not human. I mean they can communicate with each other. I will discuss about it more later.HOW TO INTERFACE ZIGBEE WITH ARDUINO :
To interface it you should know which series of it you are using. In this article I will discuss about series one only. Because it is recommended for beginners. Two Zigbee modules can talk with each other if both are of same type. To communicate to it module with each other, obtain to its modules. Connect one module to Arduino and other module to either sensor or any microcontroller or computer. You should set configuration of both modules. I will discuss late how to configure modules.
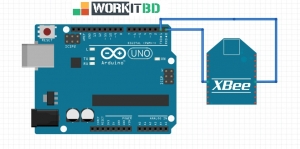
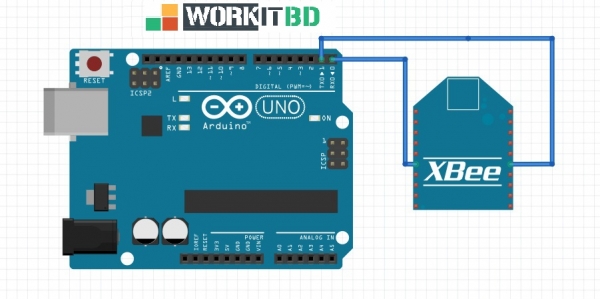
Figure above shows connection diagram of module with Arduino. Remember. You module should have regulated 5 volt and 3.3 volt. If you use Adafruit XBee Adapter it have both voltage level. Otherwise you have to use separate power supply. In above circuit. TX and RX pin of zigbee and Arduino are connected to each other. Arduino will send some instruction to zigbee and according to these instruction zigbee respond. Similary zigbee receive intructions from other zigbee to which it have address. After receiving instructions or data from other zigbee. It send data to arduino through serial pins as shown in connection. Similarly other module can be connected with one more Arduino or computer. Same connection diagram is used for other zigbee and arduino pair.
********* Code*************
void setup()
{
Serial.begin(9600);
}
void loop()
{
while (Serial.available() ) {
Serial.write(Serial.read()); /
}
}
After connecting Arduino with it, upload the above code in Arduino, Arduino start receiving whatever zigbee send to Arduino through serial communication.
HOW TO CONFIGURE ZIGBEE’S :
Follow the following instructions to configure Zigbee series 1 module :
- Connect your zigbee’s module to computer serial port using serial adapter.
- Download virtual terminal or PuTTy for windows.
- set your computer serial port. confirm that it is set to a baud rate of 9,600, 8 data bits, no parity, 1 stop bit.
- click on local Echo box.
- click ok.
- save the time of session.
- click to the connect button on virtual terminal.
- After connection with Zigbee’s give the name of your session.
- Now you are connected with Zigbee module.
- Use AT commands to configure your module.
After that type +++ on virtual terminal and after few seconds it will respond with these commands :
ATMY1234
ATDL5678
ATDH0
ATID0
ATWR
Your zigbee’s module is ready to used. Now connect other zigbee’s module with other serial port and repeat the above 10 steps. Other zigbee module will also respond with following instructions:
ATMY5678
ATDL1234
ATDH0
ATID0
ATWR
Now both zigbees modules are ready to talk with each other. If you like this article please share it with your friends. Your comments are welcome.
